Every card, explained All 168 of them
One section per card: what it does, when you're allowed to play it, what it does to the next player, and the mistake people keep making with it. The counts are the exact deck Open Mercy deals.
How many cards are in UNO No Mercy?
168 cards against a classic deck's 108. The extra 60 are what make hands spiral.
| Group | Cards | Count |
|---|---|---|
| Number cards | 0 once per color, 1 to 9 twice per color | 76 |
| Colored actions | Skip, Reverse, Draw 2, Draw 4, Skip Everyone, Discard All. Three of each, per color. | 72 |
| Plain Wild | Choose a color, no penalty | 4 |
| Special Wilds | Wild Reverse Draw 4, Draw 6, Draw 10, Color Roulette. Four of each. | 16 |
| Total | 168 |
Everyone starts with 7 cards. If the first card turned over is a wild, it goes back in and the deck is shuffled again, so a game always opens on a colored card.
Number cards
Most numbers do nothing on their own. Two of them, the 7 and the 0, move whole hands around the table.
1 to 9
Effect. None. You get rid of a card and the turn moves on.
When you can play it. On the same color, or on the same number in any color. You can't play a number card while a draw stack is building against you. At that point only draw cards are allowed.
What the next player sees. A normal turn. They match the new top card or tap the deck.
Example. The top card is a green 4. Marcus holds a green 9 and a yellow 4. Both are legal. The green 9 keeps the color on green; the yellow 4 changes it to yellow. Marcus has three more yellows in his hand, so he plays the yellow 4 and sets up his next turn.
Best use. Number cards are how you steer the color. Change it toward the color you hold most of, and away from the one the next player seems to want.
Common mistake. Treating numbers as filler and dumping them in any order. Two cards from the end, the order you play them in decides whether you finish on a color you can actually follow.
Related. What happens on a turn · Managing your hand
7: swap hands
Effect. You swap your whole hand with one other player of your choice. Eight of these exist, two per color.
When you can play it. Like any number: same color, or on another 7.
What the next player sees. Nothing at first. You get a SWAP HANDS window listing the other players. Pick one and your hands trade places. If you'd rather not swap, press KEEP MY HAND and the 7 plays like a normal number. You can't pick a player who has already been eliminated.
Example. Priya is holding 14 cards after a bad stack. Jo, two seats away, is down to 3. Priya plays a blue 7 on a blue 2, chooses Jo, and walks away with 3 cards while Jo inherits her 13 (the 7 itself has left her hand).
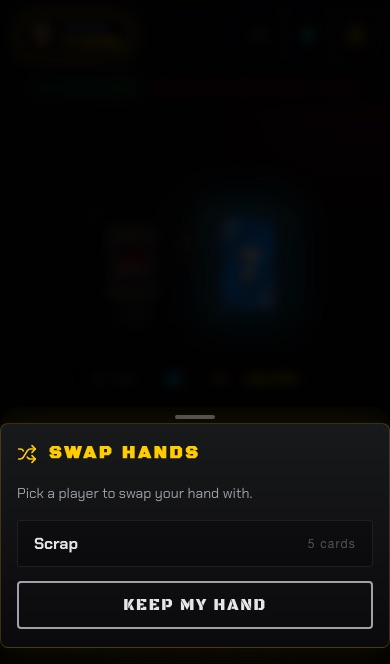
Best use. Hold a 7 while your hand is big, and spend it on whoever is closest to going out. It is the only card that can turn a losing hand into a winning one in one move.
Common mistake. Swapping on reflex when you're already doing fine. If you hold 4 cards and the best target holds 5, you've gained nothing and told the table you had a 7. KEEP MY HAND is there for a reason.
Related. The 7 and 0 rule in depth · Special decisions · Who to target in bigger games · FAQ: special cards
0: rotate all hands
Effect. Every player still in the game passes their hand one seat along the current direction of play. Four exist, one per color.
When you can play it. Same color, or on another 0.
What the next player sees. A new hand. So does everyone else. There's no choice to make; it happens as soon as the 0 lands.
Example. Play is going Priya, Marcus, Jo, Sam. Priya plays a red 0. Her hand goes to Marcus, Marcus's goes to Jo, Jo's goes to Sam, and Priya picks up Sam's hand. If Sam was sitting on 2 cards, Priya now has them.
Best use. When the player right before you (the one whose hand you'll receive) is close to going out, a 0 hands you their short hand. In a two-player game it simply swaps the two hands.
Common mistake. Forgetting that direction matters. After a Reverse, the hands travel the other way, and you receive a different player's hand than you expected. Check the direction before you play it.
Related. The 7 and 0 rule in depth · Special decisions · Reverse
Colored action cards
Three of each type in each of the four colors, so twelve copies of every one. They follow normal matching: same color, or the same action on top.
| Card | Effect | In deck |
|---|---|---|
| Skip | Next player loses their turn. | 12 |
| Reverse | Flips direction. With two players it acts as a Skip. | 12 |
| Draw 2 (+2) | Next player draws 2, unless they stack. | 12 |
| Draw 4 (+4) | Next player draws 4, unless they stack. Colored. | 12 |
| Skip Everyone | Everyone else is skipped. You go again. | 12 |
| Discard All | Every card of that color leaves your hand. | 12 |
Skip
Effect. The next player in line loses their turn.
When you can play it. On its own color, or on another Skip of any color. Not while a draw stack is live.
What the next player sees. Their turn simply doesn't come. Play jumps to the player after them.
Example. Sam is on 1 card and it's Jo's turn just before him. Jo plays a yellow Skip on a yellow 6. Sam misses his turn and Priya plays next, which gives the table one more chance to hit Sam with a draw card.
Best use. Buying time against the player who is about to go out. In a two-player game a Skip means you play again.
Common mistake. Trying to play a Skip to dodge a draw stack. A Skip has no draw value, so it can't be played while a stack is coming at you.
Related. Skip Everyone · Stacking rules
Reverse
Effect. Flips the direction of play. With exactly two players, it works as a Skip.
When you can play it. On its own color, or on another Reverse. Not while a draw stack is live.
What the next player sees. The player who just went before you is now next.
Example. Play is going Priya, Marcus, Jo. Marcus has been hammering Jo with draw cards. Jo plays a blue Reverse, and now the turn goes back to Marcus, with Priya after him.
Best use. Setting up a 0. Flip the direction first, and the next 0 sends the hands the way you want.
Common mistake. Thinking a plain Reverse bounces a draw stack back. It can't be played on a live stack at all. The card that does that is the Wild Reverse Draw 4.
Related. Two-player tactics · 0 rotate
Draw 2 (+2)
Effect. Starts a draw stack of 2, or adds 2 to one that's already building.
When you can play it. On its own color, on another Draw 2, or onto a live stack. On the default official rules, a Draw 2 can only go on top of a +2.
What the next player sees. A live stack. They either add a draw card of their own or tap the deck, take the whole stack, and lose their turn.
Example. Marcus plays a green Draw 2 at Jo. Jo has a Draw 2 of her own and adds it. The stack is at 4 and Sam is next. Sam has nothing, taps the deck, and draws 4.
Best use. Early in a stack, while it's still small. A +2 is the easiest card for someone else to answer, so it's better thrown in than saved.
Common mistake. Holding a Draw 2 as your defense against big stacks. Once a +4 or higher is on top, your +2 can't join in on official rules.
Related. Stacking rules · A stacking decision, step by step
Draw 4 (+4)
Effect. Starts a draw stack of 4, or adds 4 to one that's already building.
When you can play it. This one catches people: it's a colored card. Play it on its own color or on another Draw 4, or onto a live stack whose top card is +2 or +4 on official rules.
What the next player sees. A live stack, same as the Draw 2. Stack on it or take it.
Example. The top card is a red 3. Priya holds a blue Draw 4 and a red 8. The Draw 4 isn't legal here, because it's blue and the top card is neither blue nor a Draw 4. She plays the red 8 and keeps the +4 for later.
Best use. Answering a Draw 2 stack. It's legal on top of a +2 and pushes the total up by 4.
Common mistake. Playing it like a classic Wild Draw 4 on any color. It won't go.
Related. Wild Reverse Draw 4 · Stacking rules
Skip Everyone
Effect. Every other player is skipped and you take another turn straight away.
When you can play it. On its own color, or on another Skip Everyone. Not while a draw stack is live.
What the next player sees. Nothing changes for them except that they wait. The turn comes back to you.
Example. Four players, and it's Sam's turn. Sam plays a green Skip Everyone. Priya, Marcus and Jo are all passed over and Sam plays again, this time a green 5.
Best use. It's a free double turn. Use it to play two cards in a row when you're near the end, or to set up a Discard All on your second go. With two players it's the same as a Skip.
Common mistake. Reading it as "skip the next player." Everyone is skipped, so the next card you play is also yours, and it has to be legal on the Skip Everyone you just put down.
Related. Skip Everyone in depth · Timing your big turns · Discard All
Discard All
Effect. Every card of the Discard All's color leaves your hand at once. If two or more of them could land on top, you choose which one. That top card then applies its own effect, as if you had just played it.
When you can play it. On its own color, or on another Discard All. Not while a draw stack is live.
What the next player sees. Whatever the top card does. A plain number means a normal turn. A red Draw 2 on top means they face a +2 stack. A Skip Everyone on top means you go again.
Example. The top card is a red 6. Marcus holds a red 3, a red 8, a red Draw 2, a blue 5, and a red Discard All. He plays the Discard All, and the red 3, red 8 and red Draw 2 go with it. He chooses the Draw 2 for the top, so Jo is next facing a +2. Marcus is left holding just the blue 5.
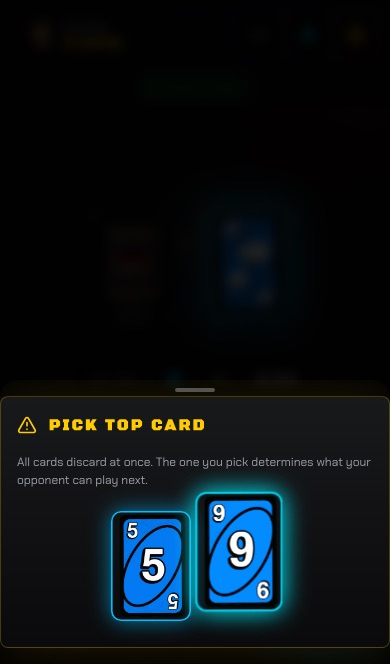
Best use. Emptying your hand in one move. If a Discard All takes your last cards, you win on the spot, and you don't need to have called MERCY! first, because you never sat on a single card.
Common mistake. Choosing a plain number for the top without thinking. The top card is your free extra effect. If you have a draw card or a Skip Everyone in the pile, put it on top.
Related. Discard All in depth · Special decisions · Managing your hand · FAQ: special cards
Wild cards
Twenty in total. They can go on any card, but only the draw wilds can go on a live draw stack, and even then the stacking rules apply.
| Card | Effect | In deck |
|---|---|---|
| Wild | Choose the color. No penalty. | 4 |
| Wild Reverse Draw 4 | Next player draws 4 and direction flips. | 4 |
| Draw 6 (+6) | Next player draws 6, unless they stack. | 4 |
| Draw 10 (+10) | Next player draws 10, unless they stack. | 4 |
| Color Roulette | The next player picks a color, then draws until they hit it. | 4 |
Wild
Effect. You choose the next color. Nothing else happens.
When you can play it. On any card, as long as no draw stack is building against you.
What the next player sees. A new color to match.
Example. The top card is a yellow Skip. Jo has no yellow and no Skip, but she has a Wild and four blues. She plays the Wild and picks blue.
Best use. Keep one back as your way out of a color you can't follow. It's the only card with no conditions.
Common mistake. Expecting a plain Wild to stop a draw stack. It has no draw value, so it can't be played while a stack is live.
Related. What happens on a turn
Wild Reverse Draw 4
Effect. Adds 4 to the draw stack and flips the direction of play. You also choose the color.
When you can play it. On any card, or onto a live stack whose top card is +2 or +4 on official rules. For stacking it counts as a +4.
What the next player sees. Because the direction flips, "next" is now the player who went before you. They face the stack.
Example. Play is going Priya, Marcus, Jo, Sam. Marcus plays a Draw 2 at Jo. Jo answers with a Wild Reverse Draw 4. The stack is at 6, the direction flips, and it's Marcus who now has to answer it or take 6.
Best use. Sending a stack back at the person who started it. With only two players it just flips direction, so your opponent still takes the draw.
Common mistake. Assuming it always saves you. It's worth 4 for stacking, so on official rules it can't go on top of a +6 or +10.
Related. Stacking rules · Two-player tactics
Draw 6 (+6)
Effect. Starts a stack of 6, or adds 6 to one that's building. You choose the color.
When you can play it. On any card, or onto a live stack whose top card is +2, +4 or +6 on official rules.
What the next player sees. A live stack they can only answer with a +6 or a +10 on official rules.
Example. Sam plays a Draw 4 at Priya. Priya adds a Draw 6. The stack is at 10, and Marcus, next in line, holds only a Draw 2. He can't put a +2 on a +6, so he draws all 10.
Best use. Answering a +4 stack late, when the total is already big enough to hurt whoever takes it.
Common mistake. Forgetting it's a wild. You don't need a color match to play it on a normal turn.
Related. Stacking rules · Risk and reward
Draw 10 (+10)
Effect. Starts a stack of 10, or adds 10 to one that's building. You choose the color. It's the heaviest single hit in the deck.
When you can play it. On any card, or onto any live stack. On official rules, only another Draw 10 can follow it.
What the next player sees. A stack only a Draw 10 can answer on official rules. Most of the time, that means drawing it.
Example. Jo is holding 16 cards. Sam plays a Draw 10 at her. She has no Draw 10, taps the deck, and reaches 25 partway through the draw. At 25 cards she is eliminated, her hand goes into the discard pile, and the game carries on without her.
Best use. Finishing off a player who is already close to 25, or ending a stack war you'd otherwise lose.
Common mistake. Throwing it out early on an empty stack. Against a short hand, 10 cards is a setback. Against a player on 18, it's the end of their game.
Related. Draw 10 in depth · The 25-card mercy rule · Risk and reward
Color Roulette
Effect. The next player names a color, then draws from the deck until a card of that color turns up. Wilds don't count toward it. They keep everything they drew, the matching card included, and lose their turn.
When you can play it. On any card, as long as no draw stack is live. It has no draw value, so it can't join a stack, and nothing can be stacked on it.
What the next player sees. A ROULETTE TRAP DETECTED window asking them to pick a color. The victim chooses, not you.
Example. Sam plays Color Roulette and Priya is next. She picks green, because nobody has played green in a while. Her first two cards are a red 5 and a Wild, which doesn't count. The third is a green 2. She keeps all three, and her turn is over.
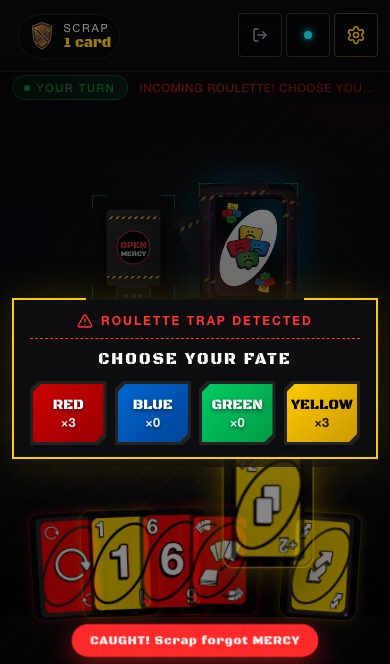
Best use. On a player who is close to 25. The draw has no cap except the deck and elimination, so there's no telling how far it goes, and you don't need a color match to play it.
Common mistake. Thinking the person who plays it picks the color. The victim picks. If you're the victim, pick a color that hasn't been played much, since more of it is probably still in the deck.
Related. Color Roulette in depth · Special decisions · FAQ: special cards
Interactions worth knowing
Yes, and you choose which of your matching cards goes on top. Finishing on a draw card passes a penalty along. Finishing on a Skip Everyone gives you another turn.
No. It has no draw value, so it can't join a stack, and nothing can be stacked onto it either.
Yes. However your hand got down to one card, the call applies. In Open Mercy the button reads MERCY! If you sit on one card without pressing it, the other players get a CAUGHT! button, and being caught costs you 10 cards.
The discard pile, minus its top card, is shuffled into a new draw pile and the draw carries on. If there genuinely aren't enough cards left, the draw stops there. The player keeps what they drew and play moves on.
None of them. Holding cards is the danger. You're out at 25, so every card you keep for a future combo is a step toward the limit.
See them in play
All 168, dealt for real. Free, no download, no login.